
How to Connect to a Base or Network in CHCNAV TX73
Watch the video or follow the step by step guide below:
1. Check whether the site has a local GPS base station.
When you arrive on a new project, first find out whether a GPS base station is already running on site.
If a base station exists, you should connect to it so the excavator knows its position on the project.
If there is no base station, you’ll need to use a CORS correction service instead.
2. Open receiver settings to view or manage correction profiles.

On the machine display, go to Menu → Common → Receiver Settings.
This screen shows technical receiver information, including visible satellites and current receiver status.
On the right side, you’ll see a list of available receiver settings or profiles.
On a new machine, this list may be blank.
3. Add a new radio base station profile if the site has a base station.
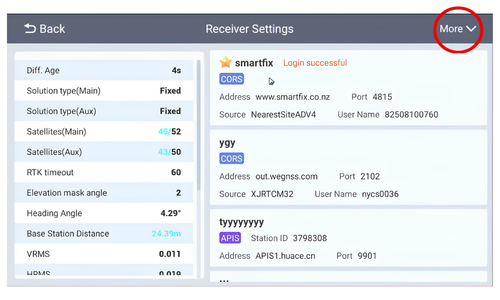
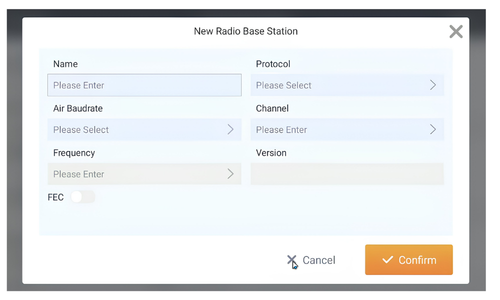
If the project has a new base station that is not already saved in the machine, you need to create a new profile.
Select More → Create Radio Base Station.
Enter the base station details provided by the project or survey team.
Confirm the settings once everything has been filled in.
You should now be able to connect to the base station
4. Add a CORS profile if there is no site base station.
If the site does not have a base station, use a CORS subscription service for GPS corrections (SmartFix, 24-7 RTK, PositionNZ etc)
If the machine already has one of these profiles saved, you can simply select it.
If not, go to More → Create CORS and enter the service details provided by your provider.
5. Apply the selected profile and make sure it becomes active

After confirming the profile, press Apply.
Once active, a star should appear next to the selected profile. That star indicates the profile is now the active correction source.
The connection should complete successfully.
6. Verify the GPS connection on the main screen.

Return to the main screen to check whether everything is working correctly.
Look for these indicators in the orange bar on the top of the screen:
Satellite count: usually around 30–40 satellites in most parts of New Zealand.
Main GPS antenna: should say Fixed.
Secondary antenna: should also say Fixed.
Residuals / accuracy values: should generally be around 20–30 mm.
If the residuals are much higher than that, stop and investigate before continuing.
7. Check cell coverage and ask for help if needed.

Make sure the machine has cell coverage, especially if you are using a correction service that depends on it.
If there is no cell coverage, you may not receive good corrections.
If anything looks wrong with the satellite count, fixed status, residuals, or connection status, call for support and ask for help.